Reusable blocks, introduced in WordPress 5.0, allow users to create and save custom blocks that can be used across different pages or posts. This increases efficiency and consistency by allowing users to create personalized blocks of content that can be easily reused. Subsequently, in WordPress 5.5, block patterns were introduced, allowing users to design layout patterns comprised of multiple blocks.
While reusable blocks have allowed users to create their own content blocks that can be reused across the site while maintaining their consistency, block patterns have offered a convenient to quickly apply common design patterns to pages and posts.
Reusable blocks and block patterns may seem similar at first glance, but there is one crucial distinction between them. Reusable blocks can be easily created directly in the Post Editor, allowing users to generate and reuse their own custom content blocks. In contrast, block patterns are established patterns installed or registered in block themes that cannot be created directly in the WordPress admin.
Starting with WordPress 6.3, reusable blocks and block patterns have been combined to form a feature called “Patterns” that provides users with the flexibility to choose whether they want to synchronize all instances of a pattern — similar to reusable blocks — or apply patterns without syncing content. The new functionality, available now in the Post Editor, empowers users to craft patterns that can function as both reusable blocks and patterns, catering to their specific requirements.
Reusable Blocks And Patterns In WordPress 6.2
Before we jump into the changes in WordPress 6.3, I think it is worth revisiting how reusable blocks and block patterns existed in the previous version, WordPress 6.2.
Let’s say you have a block of text — perhaps your business hours — at the bottom of each page of your website. Reusable blocks were designed specifically for this situation. Instead of applying the text as individual blocks on each and every page, a reusable block is created once, applied anywhere, and synced across all of the instances where it appears.
Creating Reusable Blocks In WordPress 6.2
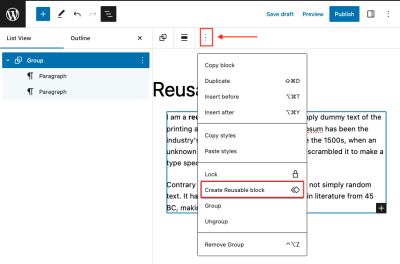
Creating a reusable block in WordPress 6.2 was fairly straightforward. Select a block, open up the additional settings, and then click on the “Create Reusable block” option.
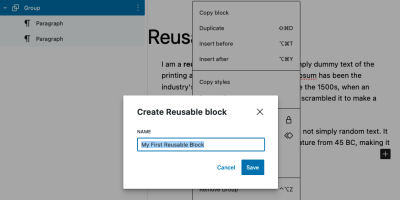
Selecting the “Create Reusable block” option triggers a popup that prompts you to name the reusable block.
Once named, the reusable block is saved and can be accessed in the Block Inserter. It’s a little tough to spot because it is the only section of the Block Inserter that is labeled with an icon instead of a text label.
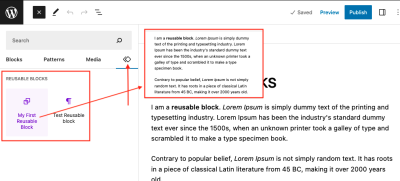
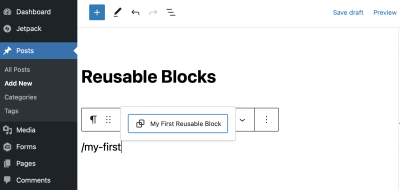
Perhaps a more convenient way to access the block is to type a forward slash (/) in the Post Editor, followed by the reusable block’s name.
Making changes to a reusable block isn’t difficult, but finding where to make changes is. You must click on the Post Editor settings while editing a page or post, then select the “Manage Reusable blocks” option.
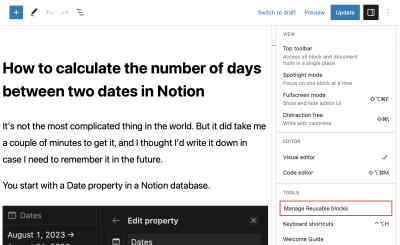
This will take you to another new editing screen where you can directly edit reusable blocks as you like. I sometimes bookmark this screen as a shortcut. Once saved, changes to reusable blocks are applied throughout the site.
Creating Block Patterns in WordPress 6.2
Unlike reusable blocks, site creators are unable to create block patterns from the Post Editor. Instead, they are treated more like plugins, where block patterns are installed and activated before they are available in the Post Editor. Once they are available, they can be accessed with the Block Inserter or a forward slash command the same way reusable blocks are added to pages and posts.
The neat thing about this plugin-like treatment is that there is a Patterns Directory full of patterns created and submitted by the WordPress community, just like we have the Plugins Directory. But that also means that patterns are developed and need to be included in a theme.
Registering Custom Block Patterns With PHP
The register-block-pattern API function was first introduced in WordPress 6.0, allowing theme authors to register custom block patterns:
register_block_pattern( 'my-first-pattern/hello-world', array( 'title' => __( 'Hello World', 'my-first-pattern' ), 'description' => _x( 'A simple paragraph block.', 'my-first-pattern' ), 'content' => "<!-- wp:paragraph -->Hello world<!-- /wp:paragraph -->", )
);
The content argument may contain any raw HTML markup, which means it’s possible to configure a group of blocks that you want to make into a pattern directly in the Post Editor, then copy and paste that group into the content field. Pasting blocks as plain text reveals the underlying raw HTML.
We want to make that into a custom function and add an action that fires the function when the theme is initialized.
function mytheme_register_block_patterns() { register_block_pattern( ... );
}
add_action( 'init', 'mytheme_register_block_patterns' );
Just as a block pattern can be registered, it can be unregistered programmatically using the unregister-block-pattern function. All it takes is the title argument.
function mytheme_unregister_my_patterns() { unregister_block_pattern( 'my-first-pattern/hello-world', array( 'title' => __( 'Hello World', 'my-first-pattern' ), ) );
}
add_action( 'init', 'my_first_patterns' );
Registering Custom Block Patterns Via The /patterns Directory
Not to be confused with the Patterns Directory I shared earlier, where you can find and install patterns made by community contributors, WordPress 6.0 has also supported registering block patterns in a /patterns file directory that lives in the theme folder.
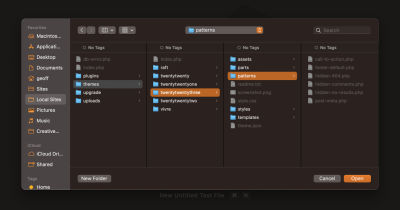
The process to register a block pattern from here is similar to the PHP approach. In fact, each pattern is contained in its own PHP file that contains the same raw HTML that can be copied and pasted into the register-block-pattern function’s content argument… only the function is not required.
Here is an example showing a pattern called “Footer with text” that is saved as footer.php in the /patterns folder:
<?php
/** * Title: Footer with text. * Slug: theme-slug/footer * Categories: site-footer * Block Types: core/template-parts/footer * Viewport Width: 1280 */
?>
<!-- block markup here -->
This particular example demonstrates another feature of block patterns: contextual block types. Declaring the “Block Types” property as core/template-parts/footer attaches the pattern to a template part (located in a /template-parts folder that sits alongside the /patterns folder) called footer.php. The benefit of attaching a block pattern to a block type is that it registers the pattern as an available transform of that block type, which is a fancy way of saying that the pattern is applied on top of another block. That way, there’s no need to modify the structure of the existing template part to apply the pattern, which is sort of similar to how we typically think of child theming but with patterns instead.
Want to add your custom block pattern to a theme template? That’s possible with the wp:pattern context:
<!-- wp:pattern { "slug":"prefix/pattern-slug" } /-->
Any entire template can be created with nothing but block patterns if you’d like. The following is an example taken from the Automattic’s Archeo theme. The theme’s home.html template file clearly demonstrates how a template can be constructed from previously registered patterns, pattern files in the /patterns theme folder, and the wp:pattern context:
<!-- wp:template-part { "slug":"header","tagName":"header" } /--> <!-- wp:group { "layout":{ "inherit":"true" } } --> <div class="wp-block-group"> <!-- wp:pattern { "slug":"archeo/image-with-headline-description" } /--> <!-- wp:pattern { "slug":"archeo/simple-list-of-posts-with-background" } /--> <!-- wp:pattern { "slug":"archeo/layered-images-with-headline" } /--> </div>
<!-- /wp:group --> <!-- wp:template-part { "area":"footer","slug":"footer","tagName":"footer" } /-->
The theme’s footer.php pattern is added to the /parts/footer.html template file before it is used in the home.html template, like this:
<!-- wp:pattern { "slug":"archeo/footer" } /-->
Additional information about registering block patterns is available in the WordPress Theme Handbook. You can also discover many use cases for block patterns in the explainer of Automattic’s themes repository on GitHub.
Reusable Blocks And Patterns In WordPress 6.3
WordPress 6.3 is notable for many reasons, one being that the reusable blocks and block patterns features are combined into a single feature simply called Patterns. The idea is that reusable blocks and block patterns are similar enough in nature that we can decide whether or not a pattern is reusable at the editing level. Instead of determining up-front whether or not you need a reusable block or a block pattern, create a Pattern and then determine whether to sync the Pattern’s content across the site.
The result is a single powerful feature that gives us the best of both worlds. WordPress 6.3 not only combined the reusable blocks and block patterns but made UI changes to the WordPress admin as well. Let’s zero in on those changes and how Patterns work in the new system.
Creating Synced Patterns
Not only are Patterns offered in the Site Editor, but they can be inserted into a page or post with the Post Editor. In fact, it works just like reusable blocks did before combining with block patterns. The only difference is that the “Create Reusable block” option in the contextual menu is now called “Create pattern/reusable block” instead.
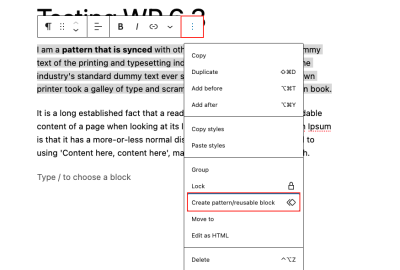
The process for creating a pattern is mostly the same, too. Select any block or group of blocks that have been inserted into the page, open the contextual menu, and select “Create pattern/reusable block.” I hope that label becomes simply “Create Pattern” in a future release. This longer label is probably there to help with the transition.
This is where things start to diverge from WordPress 6.2. Clicking “Create pattern/reusable block” still triggers a popup asking you to name the Pattern, but what’s new is a toggle to enable synced content support.
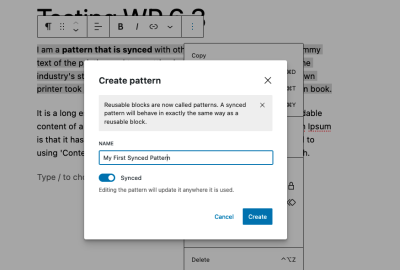
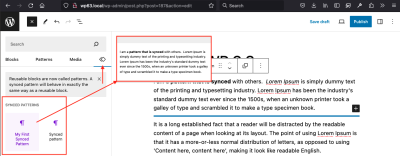
Once the pattern is saved, it is immediately available in the Block Inserter or with a slash (/) command.
Creating Standard, Unsynced Patterns
This feature, which has been a long time coming, allows us to create our own custom patterns, akin to the flexibility of reusable blocks in the Site Editor.
Let’s demonstrate how standard, unsynced Patterns work but do it a little differently than the synced example. This time, we’ll start by copying this two-column text pattern from the Patterns Directory and pasting it into a page. I’m going to change the colors around a bit and make a few other minor tweaks to the copied pattern just for fun. I’m also naming it “Two-columns Text Unsynced Pattern” in the popup. The only difference between this Pattern and the synced Pattern we created earlier is that I’m disabling the Synced setting.
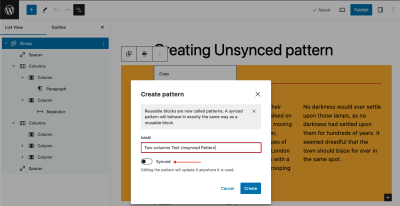
That’s really it! I just created a new custom pattern based on another pattern pulled from the Patterns Library and can use it anywhere on my site without syncing the content in it. No PHP or special file directories are needed!
Patterns Are Accessible From The Site Editor
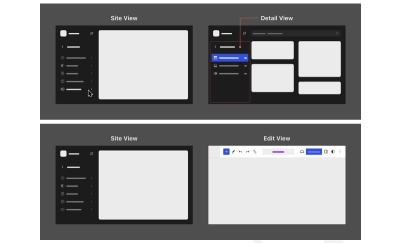
You are probably very familiar with the Site Editor. As long as your WordPress site is configured as a block theme, navigating to Appearance → Site Editor opens up the site editing interface.
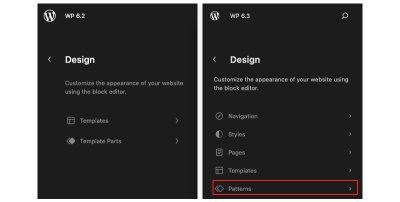
WordPress 6.3 introduces a newly redesigned sidebar panel that includes options to edit navigation, styles, pages, templates, and… patterns. This is a big deal! Patterns are now treated like modular components that can be used to craft templates at the Site Editor level. In other words, block patterns are no longer relegated solely to the Post Editor.
Clicking into Patterns in the Site Editor displays all of your saved Patterns. The patterns are conveniently split up between synced and unsynced patterns, and clicking on any of them opens up an editing interface where changes can be made and saved.
Another interesting Site Editor update in WordPress 6.3 is that patterns and template parts are now together. Previous versions of WordPress put Template Parts in the Site Editor’s top-level navigation. WordPress 6.3 replaces “Template Parts” in the Site Editor navigation with “Patterns” and displays “Template Parts” alongside patterns in the resulting screen.
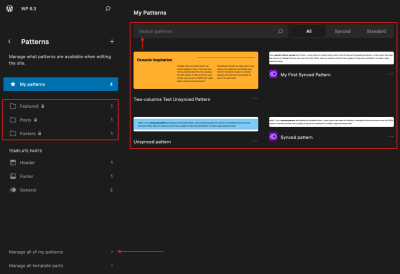
I’ll reserve judgment for later, but it’s possible that this arrangement opens up some confusion over the differences between patterns and template parts. That’s what happened when patterns and reusable blocks were separate but equal features with overlapping functionality that needed to be combined. I wonder if template parts will get wrapped up in the same bundle down the road now that there’s less distinction between them and patterns in the Site Editor.
Another thing to notice about the patterns interface in the Site Editor is how patterns are organized in folders in the side panel. The folders are automatically created when a pattern is registered as a contextual block pattern, as we demonstrated earlier when revisiting how block patterns worked in previous versions of WordPress. A lock icon is displayed next to a folder when the patterns are bundled with the active theme, indicating that they are core to the theme’s appearance rather than a pattern that was created independently of the theme. Locked patterns are ones you want to build off of, the same way we registered a Pattern earlier as a contextual block type.
Finally, a new pattern (or template part, for that matter) can be created directly from the Site Editor without having to leave and create it in the Post Editor. This is an extremely nice touch that prevents us from having to jump between two UIs as we’ve had to do in previous versions of WordPress.

Remember that screen I showed earlier that displays when clicking “Manage Reusable blocks” in the Post Editor? Well, now it is called “Patterns,” and it, too, is a direct link in the Site Editor.
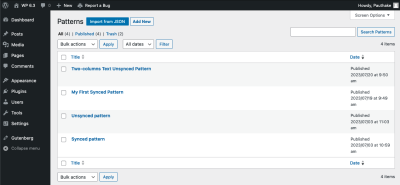
This screen displays all custom saved patterns but does not show patterns that are bundled with the theme. This may change in future releases. Matias Ventura, Gutenberg project architect, says in this GitHub discussion thread that patterns will eventually be served through the Pattern Directory instead of being bundled resources. Maybe then we’ll see all available patterns instead of only custom patterns.
Using Patterns As Starter Templates
A common use case of the earlier Patterns API that was introduced in WordPress 6.0 has been to display a few sets of starter content patterns as options that users may choose when creating a new page template in the Site Editor. The idea is to provide you with a template with a predefined layout rather than starting with a blank template and to show a preview of the template’s configuration.
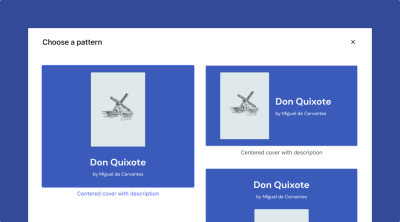
The updated Patterns API in WordPress 6.2 allows us to do this more easily by creating custom patterns for specific template types. For example, we could create a set of patterns associated with the template for single posts. Or another set of patterns for the 404 template. The benefit of this, of course, is that we are able to use patterns as starter templates!
Let’s walk through the process of using patterns as starter page templates, beginning first by registering our custom patterns with our friend, register-block-pattern(). We do have the option to register patterns in the theme’s /patterns folder, as we did earlier, but I found it did not work. Let’s go with the function instead for the tour.
Registering Custom Patterns With register-block-pattern()
We’ll start with a function that registers a Pattern that we are going to associate with the theme’s 404 page template. Notice the templateTypes argument that allows us to link the pattern to the template:
function mytheme_register_block_patterns() { register_block_pattern( 'wp-my-theme/404-template-pattern', array( 'title' => __( '404 Only template pattern', 'wp-my-theme' ), 'templateTypes' => array( '404' ), 'content' => '<!-- wp:paragraph { "align":"center","fontSize":"x-large" } --><p class="has-text-align-center has-x-large-font-size">404 pattern</p><!-- /wp:paragraph -->', ) );
}
add_action( 'init', 'mytheme_register_block_patterns' );
I pulled the bulk of this function from a GitHub Gist. It’s a small example, but you can see how cluttered things could get if we are registering many patterns for a single template. Plus, the more patterns registered for a template, the bigger that page gets, making the template as a whole difficult to read, preview, and maintain.
The default Twenty Twenty-Two WordPress theme comes with 66 patterns. That could get messy in the theme folder, but the theme smartly has added an /inc folder containing individual PHP files for each registered pattern. The same sort of strategy the themes have used to break up functions registered in the functions.php to prevent it from getting too convoluted.
For the sake of example, let’s register a few starter patterns the same way. First, we’ll add a new /inc folder to the top level of the theme folder, followed by another folder contained in it called /patterns. And in that folder, let’s add a new file called block-patterns.php. In that file, let’s add a modified version of the Twenty Twenty-Two theme’s block registration function mapped to four patterns we want to register for the 404 page template:
404-blue.phppage-not-found.php
Here’s how it all looks:
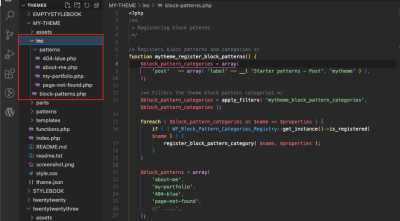
Let’s turn our attention to the patterns themselves. Specifically, let’s open up the 404-blue.php file and add the code from this Pattern in the Patterns Directory and this one as well:
<?php
/** * Blue pattern * source: https://wordpress.org/patterns/pattern/seo-friendly-404-page/
**/
?> return array( 'title' => __( '404 Blue', 'mytheme' ), 'categories' => array( 'post' ), 'templateTypes' => array( '404' ), 'inserter' => 'yes', 'content' => '<!-- wp:columns { "align":"full" } -->
<div class="wp-block-columns alignfull"><!-- wp:column { "width":"100%" } -->
<div class="wp-block-column" style="flex-basis:100%"><!-- wp:columns { "style":{" color":{ "gradient":"linear-gradient(308deg,rgba(6,147,227,1) 0%,rgb(155,81,224) 100% )" },"spacing":{ "padding":{ "right":"20px","bottom":"100px","left":"20px","top":"100px"} } } } -->
<div class="wp-block-columns has-background" style="background:linear-gradient(308deg,rgba(6,147,227,1) 0%,rgb(155,81,224) 100%);padding-top:100px;padding-right:20px;padding-bottom:100px;padding-left:20px"><!-- wp:column { "width":"1920px" } -->
<div class="wp-block-column" style="flex-basis:1920px"><!-- wp:heading { "textAlign":"center","level":1,"style":{ "typography":{ "textTransform":"uppercase","fontSize":"120px" } },"textColor":"white" } -->
<h1 class="has-text-align-center has-white-color has-text-color" style="font-size:120px;text-transform:uppercase"><strong>404</strong></h1>
<!-- /wp:heading --> <!-- wp:heading { "textAlign":"center","style":{ "typography":{ "textTransform":"uppercase" } },"textColor":"white" } -->
<h2 class="has-text-align-center has-white-color has-text-color" style="text-transform:uppercase">😭 <strong>Page Not Found</strong> 💔</h2>
<!-- /wp:heading --> <!-- wp:paragraph { "align":"center","textColor":"white" } -->
<p class="has-text-align-center has-white-color has-text-color">The page you are looking for might have been removed had it's name changed or is temporary unavailable. </p>
<!-- /wp:paragraph --> <!-- wp:search { "label":"","showLabel":false,"placeholder":"Try Searching for something else...","width":100,"widthUnit":"%","buttonText":"Search","buttonPosition":"no-button","align":"center","style":{ "border":{ "radius":"50px","width":"0px","style":"none" } },"backgroundColor":"black","textColor":"white" } /--> <!-- wp:paragraph { "align":"center","textColor":"white" } -->
<p class="has-text-align-center has-white-color has-text-color">💡 Or you can return to our <a href="#">home page</a> or <a href="#">contact us</a> if you can't find what you are looking for</p>
<!-- /wp:paragraph --> <!-- wp:buttons { "layout":{"type":"flex","justifyContent":"center" } } -->
<div class="wp-block-buttons"><!-- wp:button { "backgroundColor":"black","textColor":"white","style":{ "border":{ "radius":"50px" },"spacing":{ "padding":{ "top":"15px","right":"30px","bottom":"15px","left":"30px" } } } } -->
<div class="wp-block-button"><a class="wp-block-button__link has-white-color has-black-background-color has-text-color has-background" style="border-radius:50px;padding-top:15px;padding-right:30px;padding-bottom:15px;padding-left:30px">Go to Homepage</a></div>
<!-- /wp:button --> <!-- wp:button { "backgroundColor":"black","textColor":"white","style":{ "border":{ "radius":"50px" },"spacing": { "padding":{ "top":"15px","bottom":"15px","left":"60px","right":"60px" } } } } -->
<div class="wp-block-button"><a class="wp-block-button__link has-white-color has-black-background-color has-text-color has-background" style="border-radius:50px;padding-top:15px;padding-right:60px;padding-bottom:15px;padding-left:60px">Contact Us</a></div>
<!-- /wp:button --></div>
<!-- /wp:buttons --> <!-- wp:paragraph { "align":"center","textColor":"white","fontSize":"small" } -->
<p class="has-text-align-center has-white-color has-text-color has-small-font-size">Find the page at our <a href="#sitemap">sitemap</a></p>
<!-- /wp:paragraph --></div>
<!-- /wp:column --></div>
<!-- /wp:columns --></div>
<!-- /wp:column --></div>
<!-- /wp:columns -->'
Once again, I think it’s worth calling out the templatesTypes argument, as we’re using it to link this “404 Blue” pattern to the 404 page template. This way, the pattern is only registered to that template and that template alone.
Now that we’ve finished adding the right folders and files and have registered the “404 Blue” pattern to the 404 page template, we can create the 404 page template and see our patterns at work:
- Open up the WordPress admin and navigate to the Site Editor (Appearance → Editor).
- Open the Templates screen by clicking “Templates” in the Site Editor side panel.
- Click “Add New Template”.
- Select the “Page: 404” option.
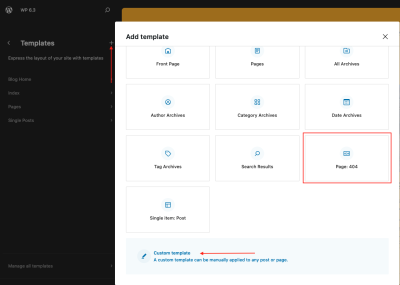
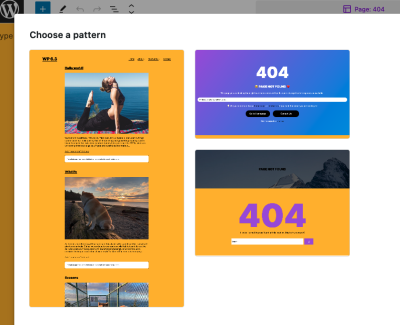
Selecting the 404 page template triggers a popup modal that prompts you to choose a pattern for the page using — you guessed it — the patterns we just registered! The default starter pattern established by the theme is displayed as well.
Custom Template With Starter Patterns
What we just did was create a set of patterns linked to the theme’s 404 page template. But what if we want to link a pattern set to a custom page template? When the Site Editor was first introduced, it only supported a few core page templates, like page, post, and front page. Now, however, we not only have more options but the choice to create a custom page template as well.
So, let’s look at that process by adding new files to the /inc/patterns folder we created in the last example:
about-me.php,my-portfolio.php.
We won’t grab code examples for these since we spelled out the full process in the last example. But I will point out that the main difference is that we change the templateTypes argument in each pattern file so that it links the patterns to the custom templates we plan on creating in the Site Editor:
<?php
/** * About Me * source: https://wordpress.org/patterns/pattern/seo-friendly-404-page/
**/
?> return array( 'title' => __( 'About Me', 'mytheme' ), 'categories' => array( 'post' ), 'templateTypes' => array( 'portfolio', 'author' ), // etc.
);
Now we can go back to the Site Editor, open the Templates screen, and select “Add new template” as we did before. But this time, instead of choosing one of the predefined template options, we will click the “Custom template” option at the bottom. From there, we get a new prompt to name the custom template. We’ll call this one “My Portfolio”:

Next, we could try to choose patterns for the template, but it leads to a blank page at the time of this writing. Instead, we can skip that step, open the template in the editor, and add the patterns to the template there as you would any other block or pattern. Click the + button in the top-left corner of the editor to open the block inserter side panel, then open the “Patterns” tab and select patterns to preview them in the custom template.
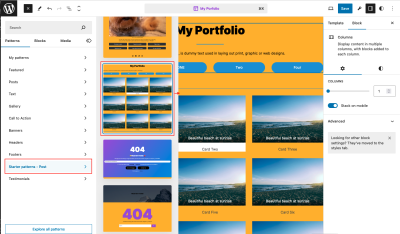
As a side note, do you see how the patterns are bundled in categories (e.g., Featured, Posts, Text, and so on)? That’s what the categories argument in the pattern file’s return array sets. If a pattern is not assigned a category, then it will automatically go into an “Unclassified” category.
The WordPress Developer Blog provides additional examples of custom starter templates.
Using Patterns In The Post Editor
We can insert custom patterns into pages and posts using the Post Editor in the same way we can insert them into templates using the Site Editor. In the Post Editor, any custom patterns that are registered but not linked to specific templates are listed in the “My patterns” category of the Block Inserter’s “Patterns” tab.
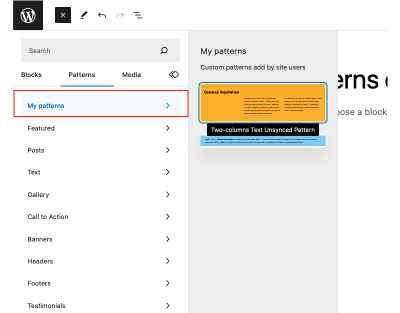
This discussion on GitHub suggests that displaying categories for custom patterns will be prioritized for a future release.
Using Patterns From The Patterns Directory
We’ve certainly danced around this topic throughout the rest of the examples we’ve covered. We’ve been copying and pasting items from the Patterns Directory to register our own custom patterns and link them to specific page templates. But let’s also see what it’s like to use a pattern directly from the Patterns Directory without modifying anything.
If you’ve installed a plugin from the Plugins Directory, then you are already familiar with installing patterns from the Patterns Directory. It’s the same concept: members from the community contribute open-source patterns, and anyone running a WordPress site can use them.
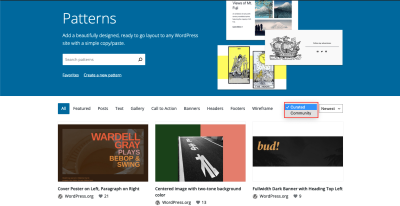
The library allows users to select patterns that are contributed by the “community” or “curated” by the WordPress.org team, all of which fall in a wide range of different categories, from Text and Gallery to Banners and Call to Action, among many others.
Adding a pattern to a site isn’t exactly the same as installing a plugin. A plugin can be installed directly from the Plugins Directory via the WordPress admin and activated from there. Patterns, however, should be added to a block theme’s theme.json, registered in the patterns object using the pattern’s slug as the value. Multiple patterns can be registered with comma-separation:
{ "version": 2, "patterns": [ "short-text", "patterns-slug" ], // etc.
}
The following example uses a pattern called “Slanted Style Call To Action” from the Patterns Directory. It is used in the theme.json file of a theme I cloned from the default Twenty Twenty-Three theme:
{ "version": 2, "patterns": [ "slanted-pattern", "slanted-style-call-to-action" ]
}
Now, we can view the newly added pattern in the Post Editor by opening the Block Inserter and selecting the Patterns tab, where the pattern is listed. Similarly, it’s possible to use the Block Inserter’s search function to pull up the pattern:
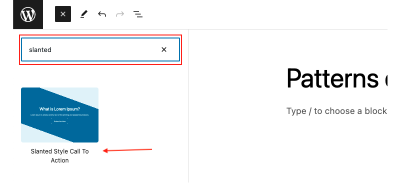
For those of you who would like to use patterns directly from the Pattern Directory without first registering them, the GutenbergHub team has created a page builder app that makes that possible. They have an introductory video that demonstrates it.
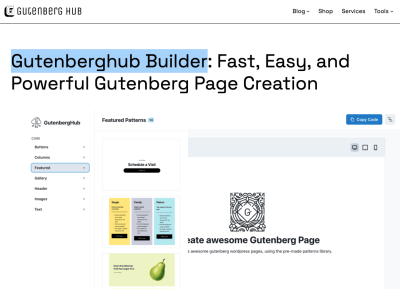
You can copy the code from the app and paste it into a site, which makes it much easier to build complex layout patterns in a low-code fashion. Jamie Marsland shows in this short video (at 1:27) how the app can be used to create an entire page layout, similar to a full-fledged page builder, by selecting desired page sections from the Patterns Directory.
Learn more about creating starter patterns in the “Utilizing patterns” section of the WordPress Developer Resources documentation.
Aspect Ratio For Large Images
You may have already noticed that the core/image block didn’t allow dimensions or aspect-ratio controls for images that were added to the block. With WP 6.3, you can control the aspect ratio of an image, which will be preserved when you change it with another one of different sizes.
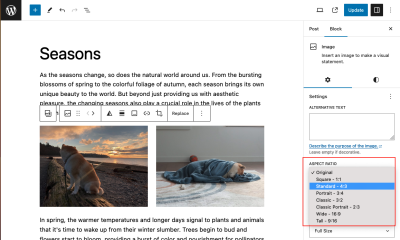
This feature will be helpful when replacing images in block patterns. This short video shows you how image aspect ratio can be used in block patterns.
For an additional in-depth discussion and rationale, please visit GitHub PRs #51078, #51144, #50028, and #48079.
Wrapping Up
In this article, we discussed the new evolving block patterns feature in WordPress 6.3 and showed a few use cases for creating custom patterns within the site editor. This new feature provides users with unlimited ways to arrange blocks and save them as patterns for widespread use. The integration of reusable blocks and traditional patterns within the Site and Post Editors aims to streamline workflows, enhance content creation, and prepare for upcoming enhancements in WordPress 6.4.
In addition, the WordPress 6.4 roadmap includes more advanced features for patterns that we have to look forward to:
You can check out this WordPress TV video to learn more details about how the block patterns are evolving. Additionally, work-in-progress issues can be tracked on GitHub.
Note: Since this article was written, WordPress 6.4 Beta 1 has been released. The new release allows users to better organize synced and unsynced patterns with categories as part of the creation process. Please refer to the release note for more up-to-date information.
Further Reading

(gg, yk, il)


