Window tilling is often associated with window managers, which lets you arrange multiple windows without wasting any display area.
Guess what? You no longer have to use a window manager for basic window tiling as many desktop environments let you do that by default or with the help of plug-ins (or extensions).
I came across such an extension for GNOME which makes it pretty easy to tile windows, i.e., “Tiling Assistant“. It lets you arrange windows using your mouse and keyboard without needing to create a config file.
So in this tutorial, I will walk you through how you can install and use the Tiling Assistant in GNOME.
Here’s How to Install Tiling Assistant
There are multiple ways to install GNOME extensions on Linux, but here, I pick the least complicated one: using the web browser.
First, visit the official page of the Tiling Assistant extension and click on the Install button as shown in the screenshot below:
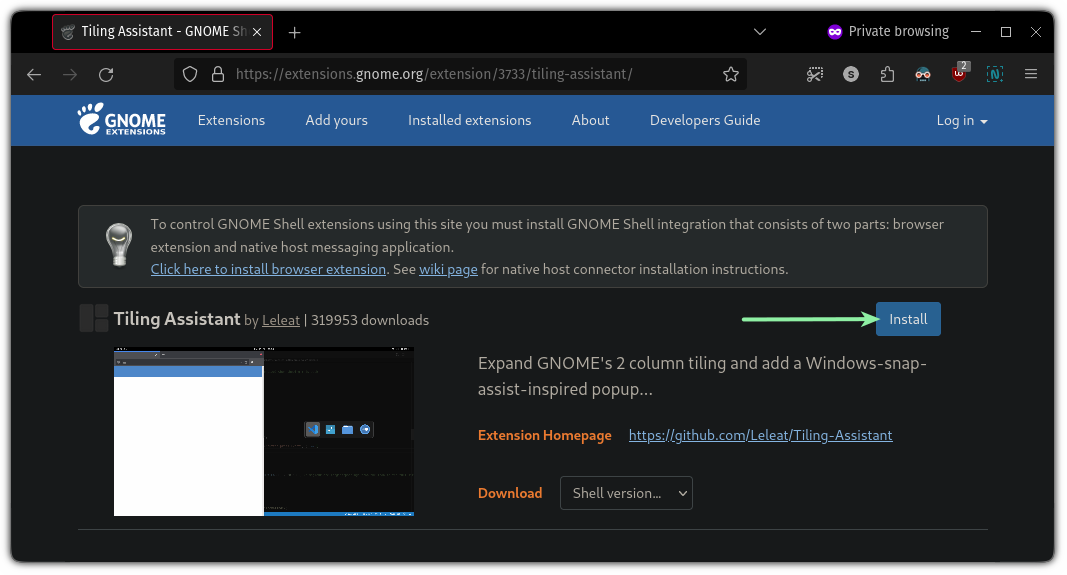
Right after the installation, you can start using this utility. If you face issues, you might want to refer to our guide on installing extensions:

For instance, snap your window by dragging it to any corner, and it will ask you to choose which running application you want to be used for the remaining space:
- Top 18 Best Web Hosting Services In 2024: Despite there are multiple web hosting providers available in the market, choosing the best one is really a hard nut to crack!! Because almost all service providers are offering their services with the same features and quality.
- How to start your own Crypto currency website: For a cryptocurrency news website, choosing the right Content Management System (CMS) is crucial for managing content effectively, ensuring security, and providing a great user experience. Here are some of the best CMS options tailored for such a site, each with its unique strengths:
- The Evolution of Coffee Brewing Methods: A Historical Perspective: Coffee has been brewed and enjoyed for centuries, with various methods evolving over time to create the perfect cup of joe. From early methods like the Ibrik method and coffee pots for coffee houses to modern technologies like the AeroPress and Hario V60, the world of coffee brewing has come a long way.
- Stop WordPress from Creating Extra Cropped Image Sizes: Whenever you upload an image to your WordPress site through the media library, it automatically creates and stores multiple additional versions of that image. If your site doesn’t utilize these extra image sizes, they will consume valuable storage space and increase the size of your server backups.
- Explain WordPress Portfolio and how to created them: WordPress portfolios are digital showcases for individuals or businesses to display their work, projects, or professional accomplishments. This feature is particularly useful for creatives, freelancers, and agencies looking to exhibit their skills or services in a visually appealing and organized manner. Portfolios in WordPress can be created using various methods, including themes that come with built-in portfolio functionalities, plugins that add portfolio features, or custom coding for a more personalized approach.
- 15 Essential WordPress Plugins For Every Site: Plugins are essential for every type of website, as they provide additional features and customization options that are not available in the core WordPress platform. A study by CodeinWP found that the average WordPress site has 20 active plugins, indicating the importance of plugins in website development.
- SAILING and YACHTING: Awesome Sailing Vlogs for the Enthusiast
- Comparing Google and Microsoft’s Success in Capitalizing on Generative AI: The buzz of interest in AI services helped drive revenue for Microsoft’s biggest unit, cloud services—up by 7 percentage points compared to a year ago—and Microsoft’s overall sales rose 17 percent to nearly $62 billion. It also gained cloud market share, Nadella added. The number of $100 million cloud deals that Microsoft landed increased 80 percent during the quarter compared to the same period a year ago, and $10 million deals doubled.
- The Best WordPress Hosting Solution in Australia: Each of our WordPress hosting solutions are fine-tuned, blazing fast and are ready for you! Starting a WordPress website has never been easier with our free 1-click WordPress installation, enterprise-grade security and an assortment of tutorials and helpful guides to get you started, all backed by our 99.9% uptime guarantee.
- Elementor vs Beaver Builder: A Comparison of Design Flexibility and Performance in WordPress: Elementor and Beaver Builder are two of the most widely recognized options, each providing distinct features that cater to varying user requirements. This article conducts a comprehensive comparison of these tools, examining their design flexibility, performance metrics, and overall user experience.
- The Best Contact Form Plugins for WordPress to Easily Manage User Inquiries: In an effort to improve user interactions on WordPress websites hosting, the examination of contact form plugins becomes essential. This article aims to present an overview of the top 5 contact form plugins available for WordPress, highlighting their features and pricing structures to facilitate an well-considered choices process.
- What are the 20 best Joomla plugins: Joomla plugins are small, task-specific extensions that enhance or modify the core functionality of a Joomla website. They operate as event-driven scripts, listening for specific “events” triggered by Joomla or its components and executing corresponding actions. Plugins are a crucial part of Joomla’s extensibility, allowing developers to add features or customise behaviour without altering the core Joomla code.
- How to design a strong off-page SEO strategy: Lessons learnt from earning over 50,000 contextual links for thousands of websites in the toughest niches. In 2023, virtually every business that has a website is prioritizing their investment in SEO. The reason being, amidst the chaos of the current year, customers are resorting to online channels for safe purchasing, and optimizing their online presence is a surefire way to gain an edge over rivals. While some firms have set up internal teams, and others have hired external agencies to boost their search engine rankings, a documented off-page SEO strategy is still a rarity among most businesses.
- What are WordPress Plugins? WordPress plugins are modular pieces of software that can be added to a WordPress site to extend or enhance its functionality without modifying the core WordPress code. They allow website owners to add features, improve performance, and customise the behaviour of their websites easily, catering to a wide range of needs, from SEO and security to e-commerce and design enhancements.
Window tiling and resizing using Tiling Assistant
Do you see that? After tiling and organizing the windows, you can resize them and active windows will retain the ratio, making the best use of the display area.
But you can do a lot more than that (hint: through keyboard shortcuts).
Fret not, I shall highlight a few ways to make the most out of it.
Using the Tiling Assistant in GNOME
If you want to unleash the true potential of the extension, you must try the keyboard shortcuts to tile windows at the speed of light!😉
To open the settings prompt, press the settings icon 🛠 from the official page of Tiling Assistant:
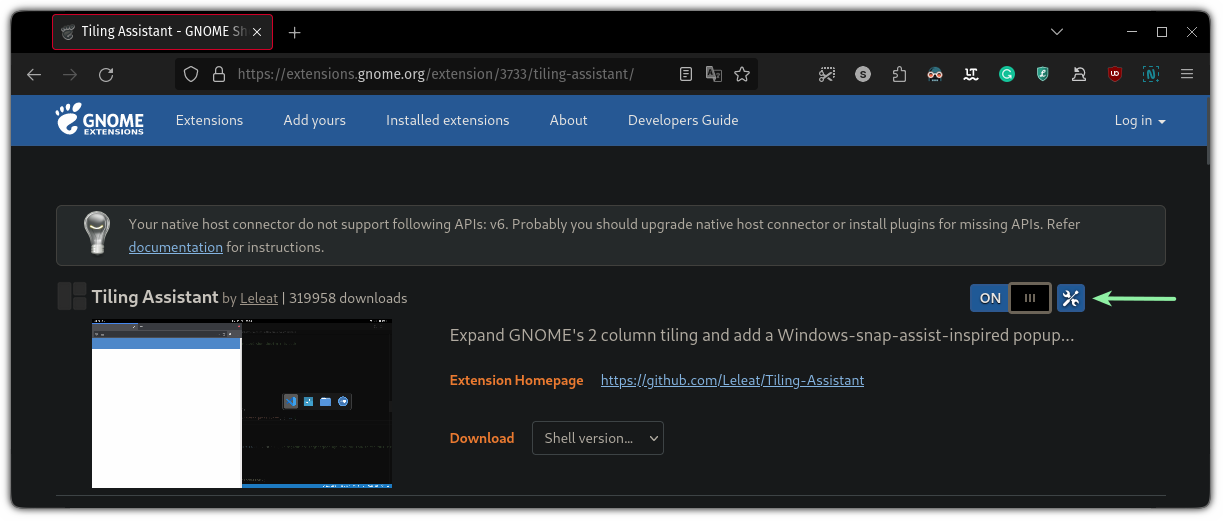
It will then display a settings prompt. You can then head over to the Keybindings section:
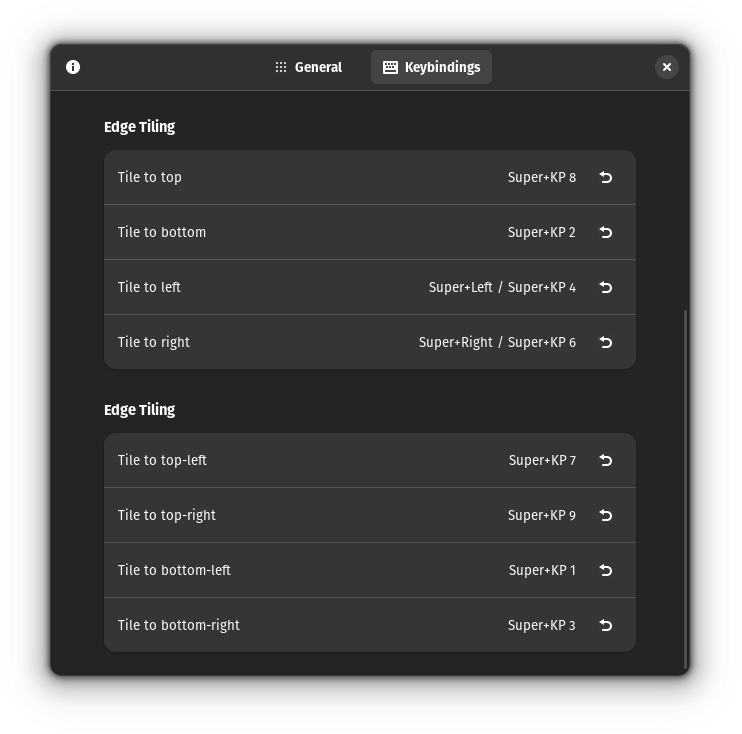
Here, you will find every keybinding (shortcut) utilizes the KP associated to a number such as for Tilling to top-left, press Super + KP 7.
So what is KP here? It refers to the keypad (the number pad in a full-sized keyboard). This means each keybinding wants you to press some numbers from the number pad.
I use a TKL (ten keyless) keyboard, so I don’t have access to a number pad.
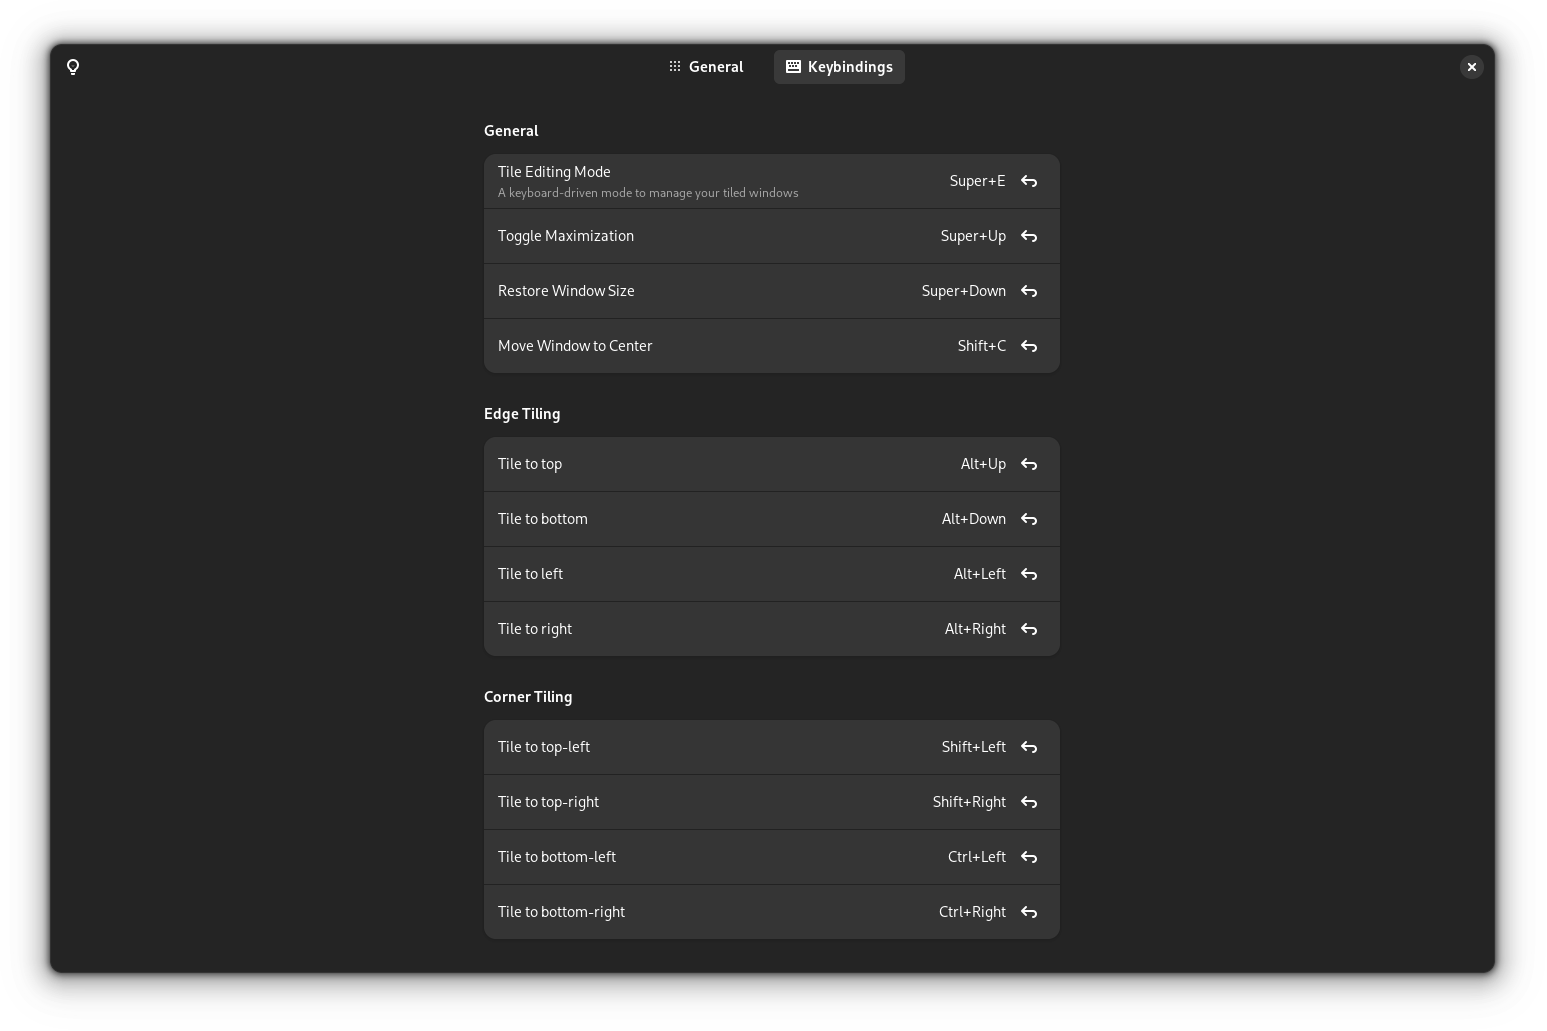
So, I changed every keybinding as to my liking:
🚧
Before using the same keybindings like mine, make sure it does not conflict with any existing ones.
Now, let’s explore how you can use this utility to arrange windows.
The Basics
The simplest use case is where you maximize, minimize, and align the window to the center of the display.
To maximize the window, all you have to do is press Super + Up arrow and it will maximize the focused window:
To restore the window, press the Super + Down arrow:
But what if you want to align the focused window to the center? By default, this functionality is disabled, which means you have to configure a shortcut by yourself.
I have assigned Shift + C to align the window to the center, but you can use any of your preferred ones:
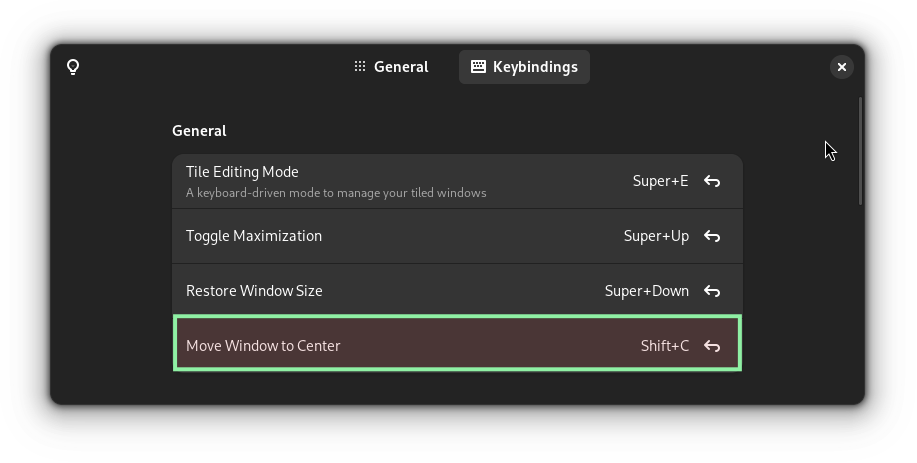
Once configured, here’s how it will move the window to the center:
Using the edge tiling (the heart of this utility ❤️)
The heart of this utility? How?
First, allow me to share what edge tiling is, and then you shall realize why it’s an important use-case.
Using the edge tilting, you can tile two windows, so you’ll be dividing your display area 50% to each window.
You choose one window that can be placed on the bottom, top, left, or right side of the display and will cover the half the area of the available screen.
For the remaining half of the screen, it will show the list of the active processes from which you can select one, and it will be tiled on the remaining half of the screen.
Sounds confusing? Let me show you how you can use it:
In the above demonstration, the focused window was Firefox.
Once I tiled it to the left side, it asked me what to be tiled on the remaining right part. I picked the file manager.
Yes, it’s that simple.
You can also tile your windows horizontally (top and bottom):
You can use your mouse cursor to resize tiled windows pretty easily:
But what if you want to do the same using the keyboard? I got you, don’t worry!
Using corner tiling
The edge tiling is cool but it will only let you use two windows.
What if you would like to use more than that? Corner tiling is your answer.
Unlike edge tiling, where it will ask you to choose from the available windows right after tiling the first, you get the prompt after the second window.
This way, you can tile three windows (if you selected a window from the available prompt). However, you can press the Esc key to skip the selection part.
For the fourth and the last tile, it will show the available options and from there, you can choose from the available choices.
Here’s how you can tile four windows using the corner tiling:
Resizing tiled windows using a keyboard
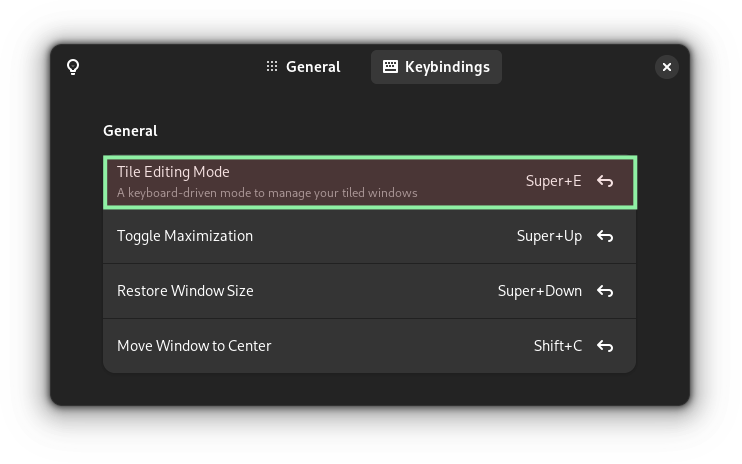
To resize the tiled windows, first, you have to enable the Tile Editing Mode by assigning a shortcut to it.
I use Super + E but you can use what is more relevant to your workflow:
📋
To use tile editing mode, your windows must be tiled already!
To use the tile editing mode, all you have to do is follow these simple steps:
- Trigger the tile editing mode using the previously defined shortcut.
- Use arrow keys to navigate to a window that needs to be resized.
- Use
Super + arrow_keyonce to mark which side needs of the window needs to be resized. For example, if I want to resize the left side, then I will pressSuper + Left_arrow. - Once marked, you can use the super key with any arrow key to resize it. For example, I marked the left side and if I wish to enlarge it on the left side, then I will press
Super + left_arrowbut if I intend to decrease the left side, then I will useSuper + right_arrow.
Sounds complex? Here’s how I resized multiple windows using tile editing mode:
That was pretty swift. Right?
Want More Control? Use a Window Manager Instead!
If you want more control over window management, plugins may not satisfy your requirements.
Window managers are highly customizable to the minute details, where you have to instruct your system through a configuration file. Sure, not for everyone, but it is a powerful way.
No idea where to start? You can refer to our detailed guide on using the I3 window manager:

If you want something easy that works out of the box, then using Regolith Linux is a great way to get started:
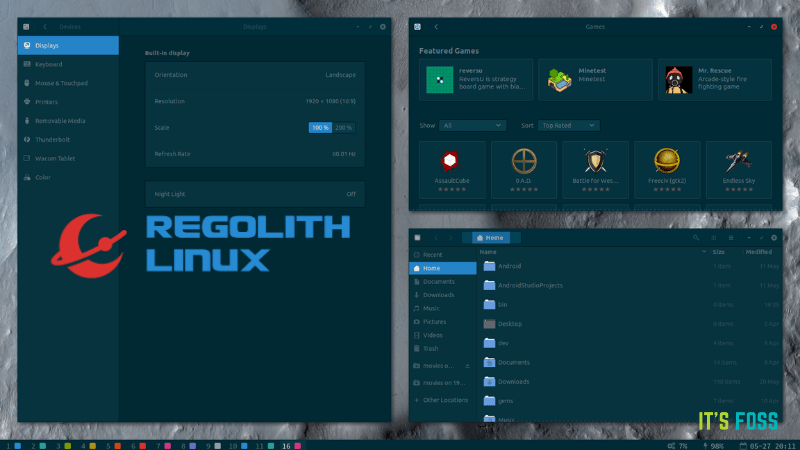
You can also choose to use distributions Pop!_OS, Nitrux, or Rhino Linux with tiling feature out of the box.
What do you think about GNOME’s Tiling Assistant? Do you prefer a window manager or a distro that comes baked with an auto-tiling feature?


